Update: New blog posts
Yesterday, I created this image using Stable Diffusion and ControlNet, and shared on Twitter – an illustration that also functions as a scannable QR code.
The process of creating it was super fun, and I’m quite satisfied with the outcome.
In this post, I would like to share some insights into my learning journey and the approaches I adopted to create this image. Additionally, I want to take this opportunity to credit the remarkable tools and models that made this project possible.
Get into the Stable Diffusion
This year has witnessed an explosion of mind-boggling AI technologies, such as ChatGPT, DALL-E, Midjourney, Stable Diffusion, and many more. As a former photographer also with some interest in design and art, being able to generate images directly from imagination in minutes is undeniably tempting.
So I started by trying Midjourney, it’s super easy to use, very expressive, and the quality is actually pretty good. It would honestly be my recommendation for anyone who wants to get started with generative AI art.
On my end, being a programmer with strong preferences, I would naturally seek for greater control over the process. This brought me to the realm of Stable Diffusion. I started with this guide: Stable Diffusion LoRA Models: A Complete Guide. The benefit of being late to the party is that there are already a lot of tools and guides ready to use. Setting up the environment quite straightforward and luckily my M1 Max’s GPU is supported.
QR Code Image
A few weeks ago, nhciao on reddit posted a series of artistic QR codes created using Stable Diffusion and ControlNet. The concept behind them fascinated me, and I defintely want to make one for my own. So I did some research and managed to find the original article in Chinese: Use AI to Generate Scannable Images. The author provided insights into their motivations and the process of training the model, although they did not release the model itself. On the other hand, they are building a service called QRBTF.AI to generate such QR code, however it is not yet available.
Until another day I found an community model QR Pattern Controlnet Model on CivitAI. I know I got to give it a try!
Setup
My goal was to generate a QR code image that directs to my website while elements that reflect my interests. I ended up taking a slightly cypherpunk style with a character representing myself :P
Disclaimer: I’m certainly far from being an expert in AI or related fields. In this post, I’m simply sharing what I’ve learned and the process I followed. My understanding may not be entirely accurate, and there are likely optimizations that could simplify the process. If you have any suggestions or comments, please feel free to reach out using the links at the bottom of the page. Thank you!
1. Setup Environment
I pretty much follows Stable Diffusion LoRA Models: A Complete Guide to install the web ui AUTOMATIC1111/stable-diffusion-webui, download models you are interested in from CivitAI, etc. As a side note, I found that the user experience of the web ui is not super friendly, some of them I guess are a bit architectural issues that might not be easy to improve, but luckily I found a pretty nice theme canisminor1990/sd-webui-kitchen-theme that improves a bunch of small things.
In order to use ControlNet, you will also need to install the Mikubill/sd-webui-controlnet extension for the web ui.
Then you can download the QR Pattern Controlnet Model, putt the two files (.safetensors and .yaml) under stable-diffusion-webui/models/ControlNet folder, and restart the web ui.
2. Create a QR Code
There are hundreds of QR Code generators full of adds or paid services, and we certainly don’t need those fanciness – because we are going to make it much more fancier 😝!
So I end up found the QR Code Generator Library, a playground of an open source QR Code generator. It’s simple but exactly what I need! It’s better to use medium error correction level or above to make it more easy recognizable later. Small tip that you can try with different Mask pattern to find a better color destribution that fits your design.
3. Text to Image
As the regular Text2Image workflow, we need to provide some prompts for the AI to generate the image from. Here is the prompts I used:
(one male engineer), medium curly hair, from side, (mechanics), circuit board, steampunk, machine, studio, table, science fiction, high contrast, high key, cinematic light,
(masterpiece, top quality, best quality, official art, beautiful and aesthetic:1.3), extreme detailed, highest detailed, (ultra-detailed)(worst quality, low quality:2), overexposure, watermark, text, easynegative, ugly, (blurry:2), bad_prompt,bad-artist, bad hand, ng_deepnegative_v1_75t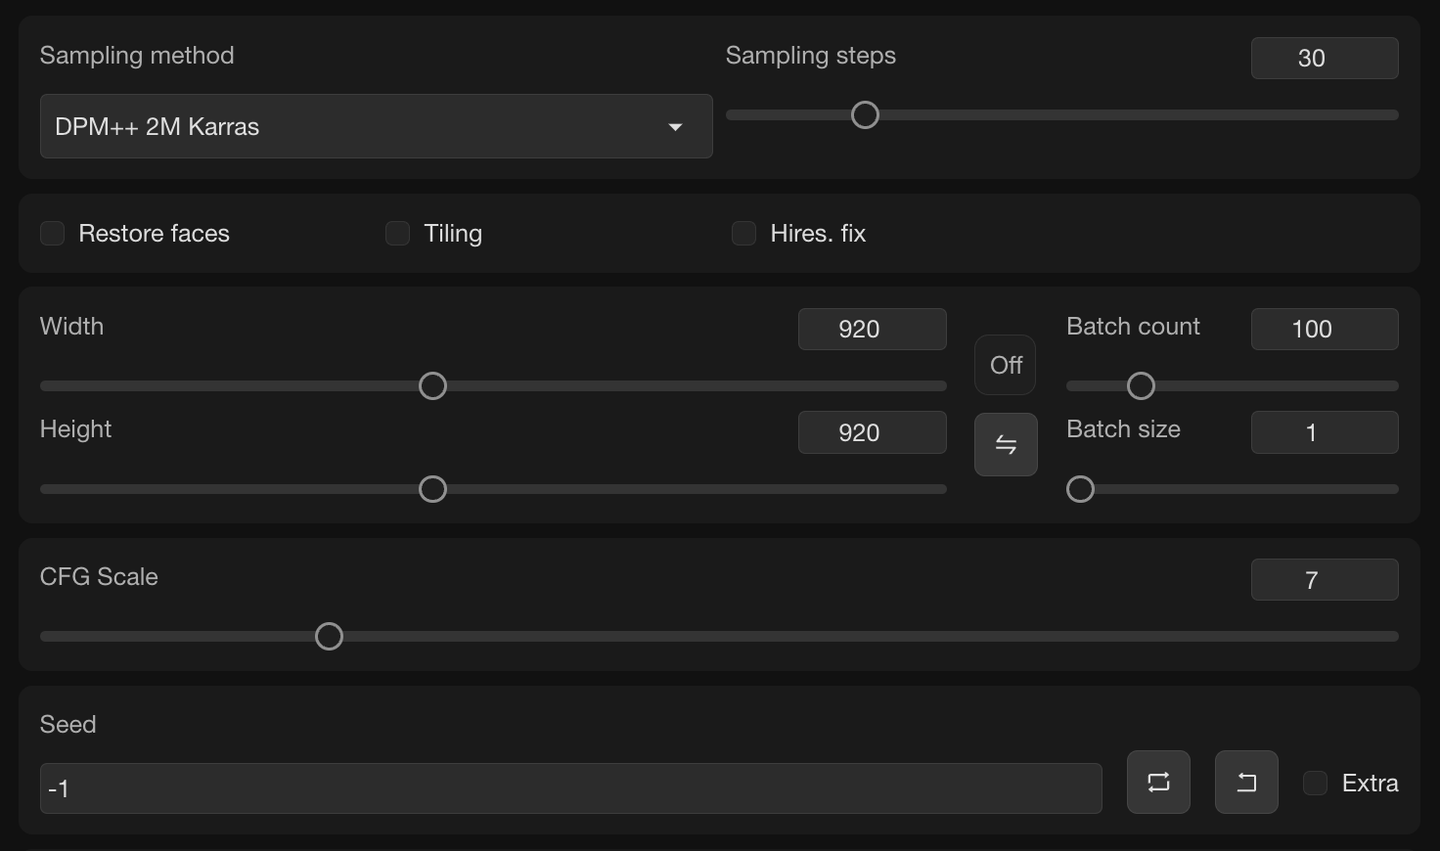
Then we need to go the ControlNet section, and upload the QR code image we generated earlier. And configure the parameters as suggested in the model homepage.
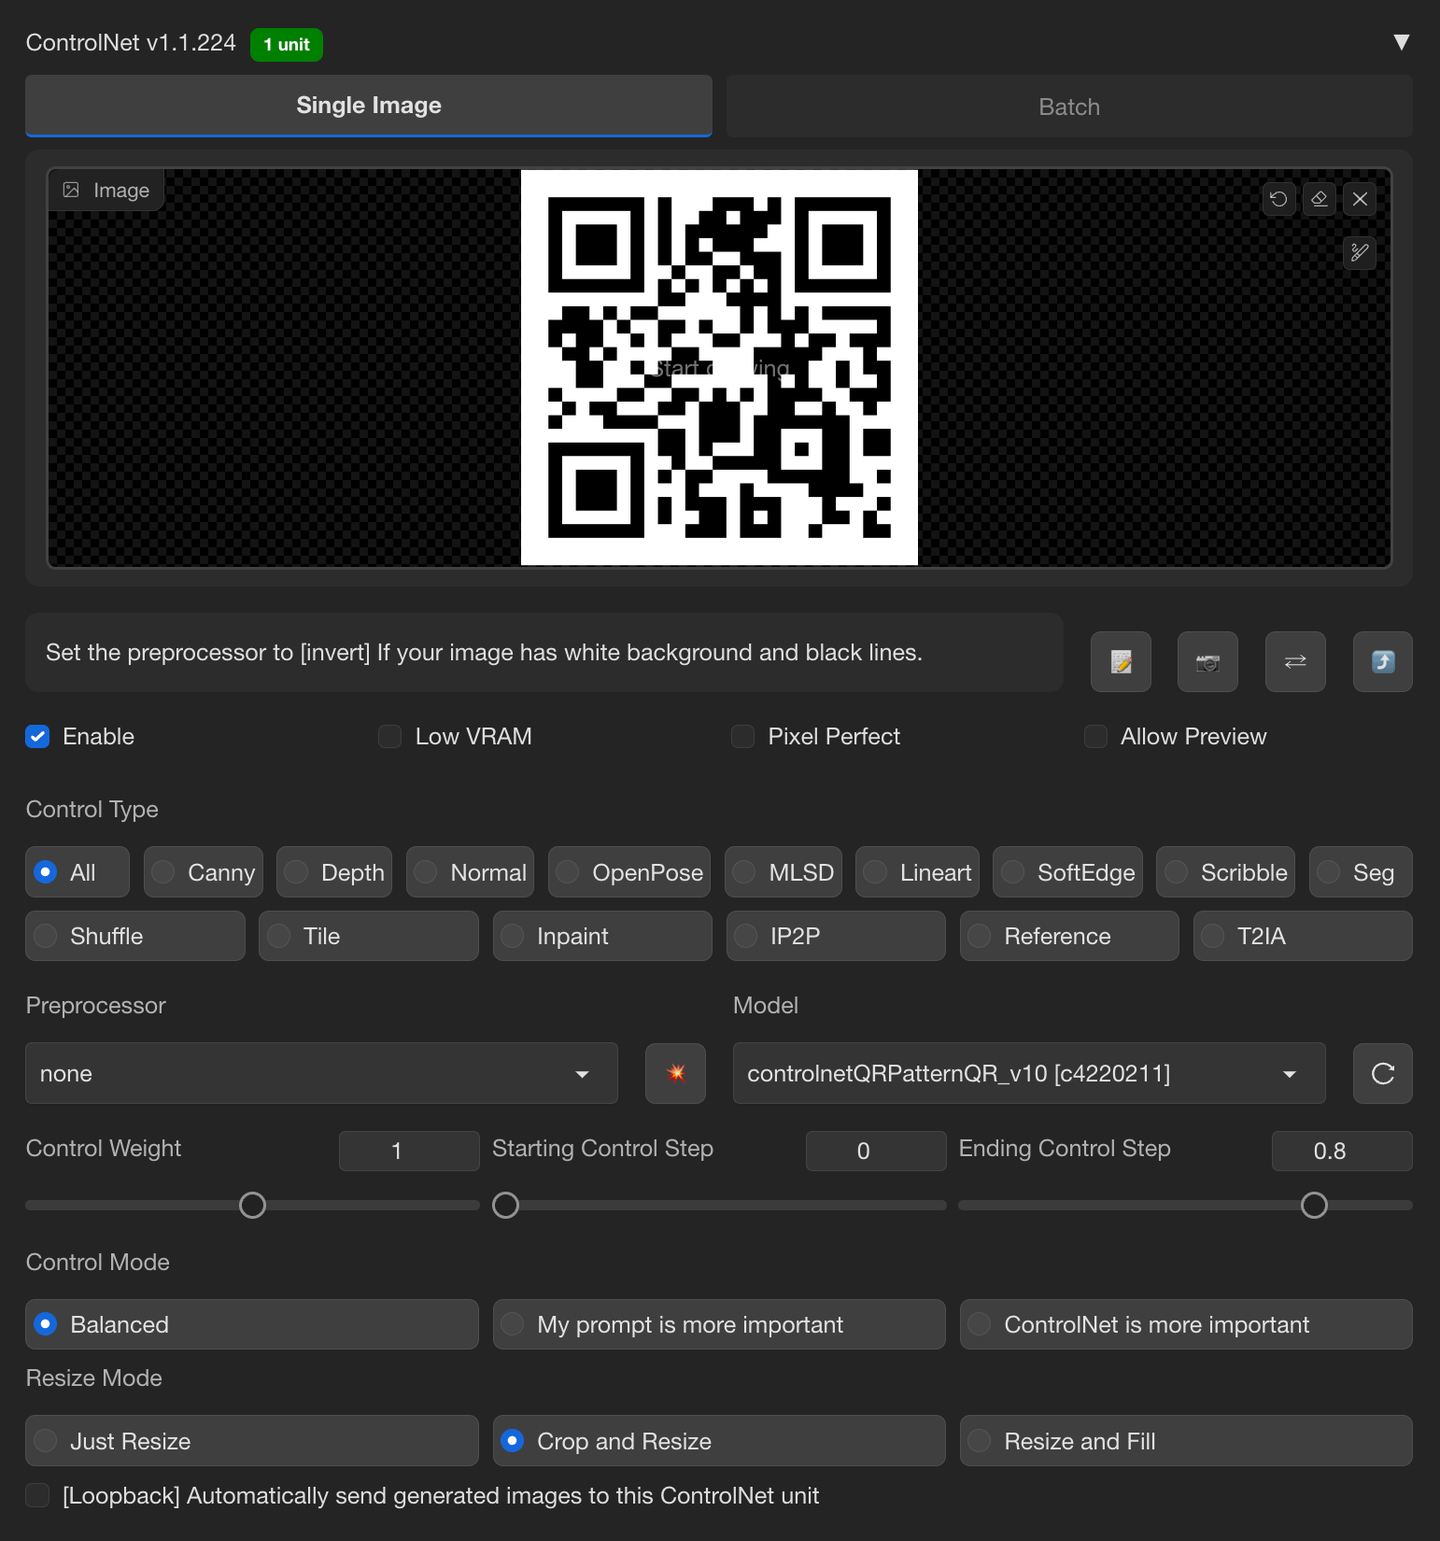
Then you can start to generate a few images and see if it met your expectations. You will also need to check if the generated image is scannable, if not, you can tweak the Start controling step and End controling step to find a good balance between stylization and QRCode-likeness.
4. I’m feeling lucky!
After finding a set of parameters that I am happy with, I will increase the Batch Count to around 100 and let the model generate variations randomly. Later I can go through them and pick one with the best conposition and details for further refinement. This can take a lot of time, and also a lot of resources from your processors. So I usually start it before going to bed and leave it overnight.
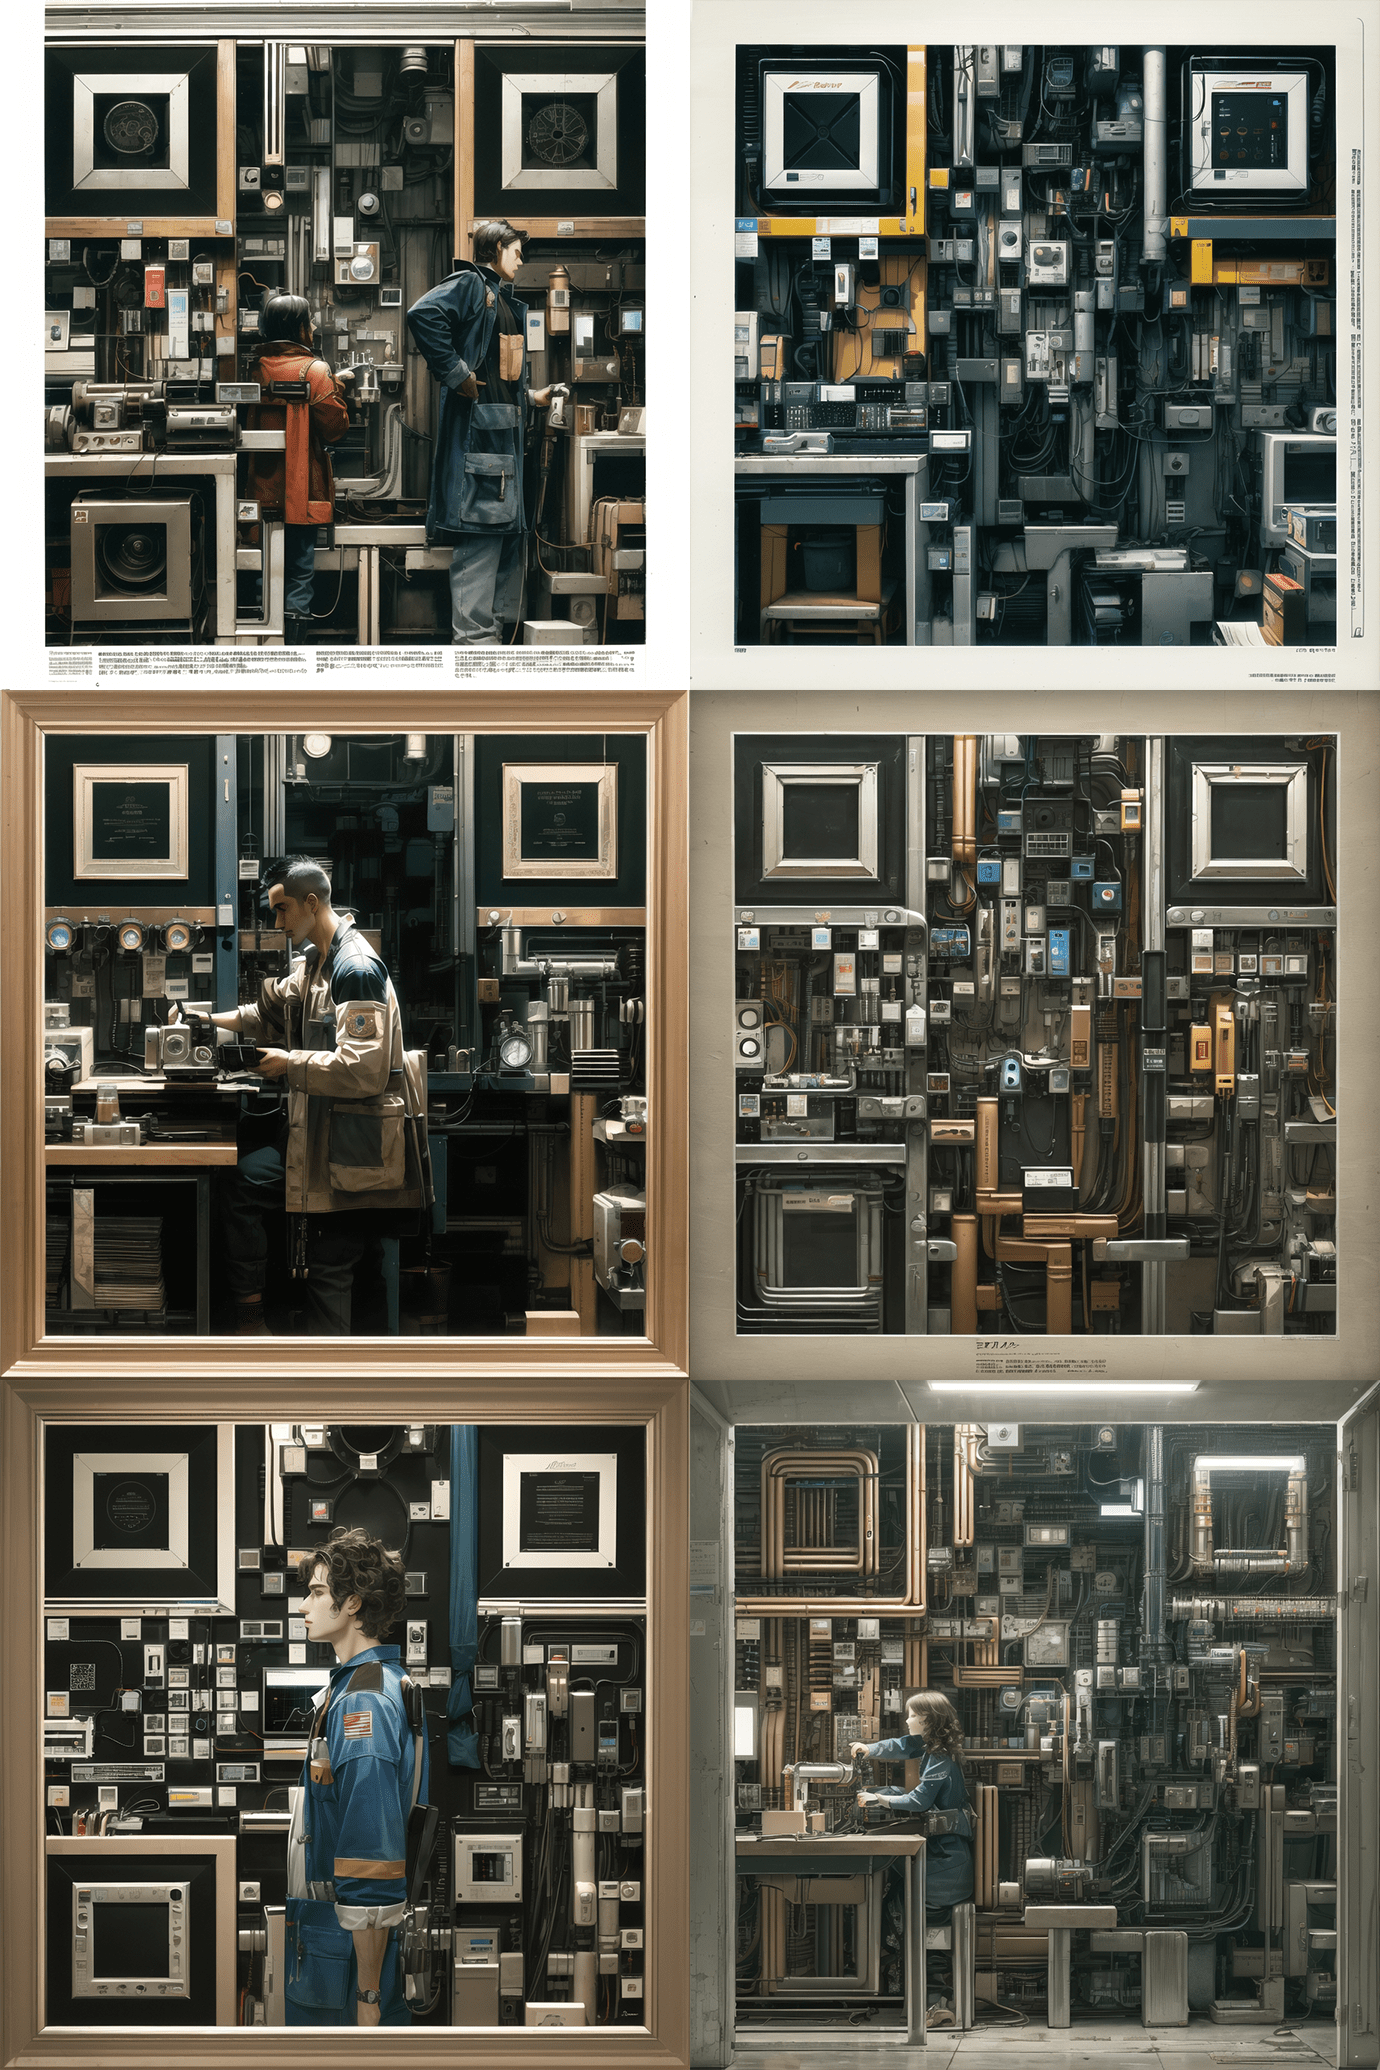
Here are some examples of the generated variations (not all of them are scannable):
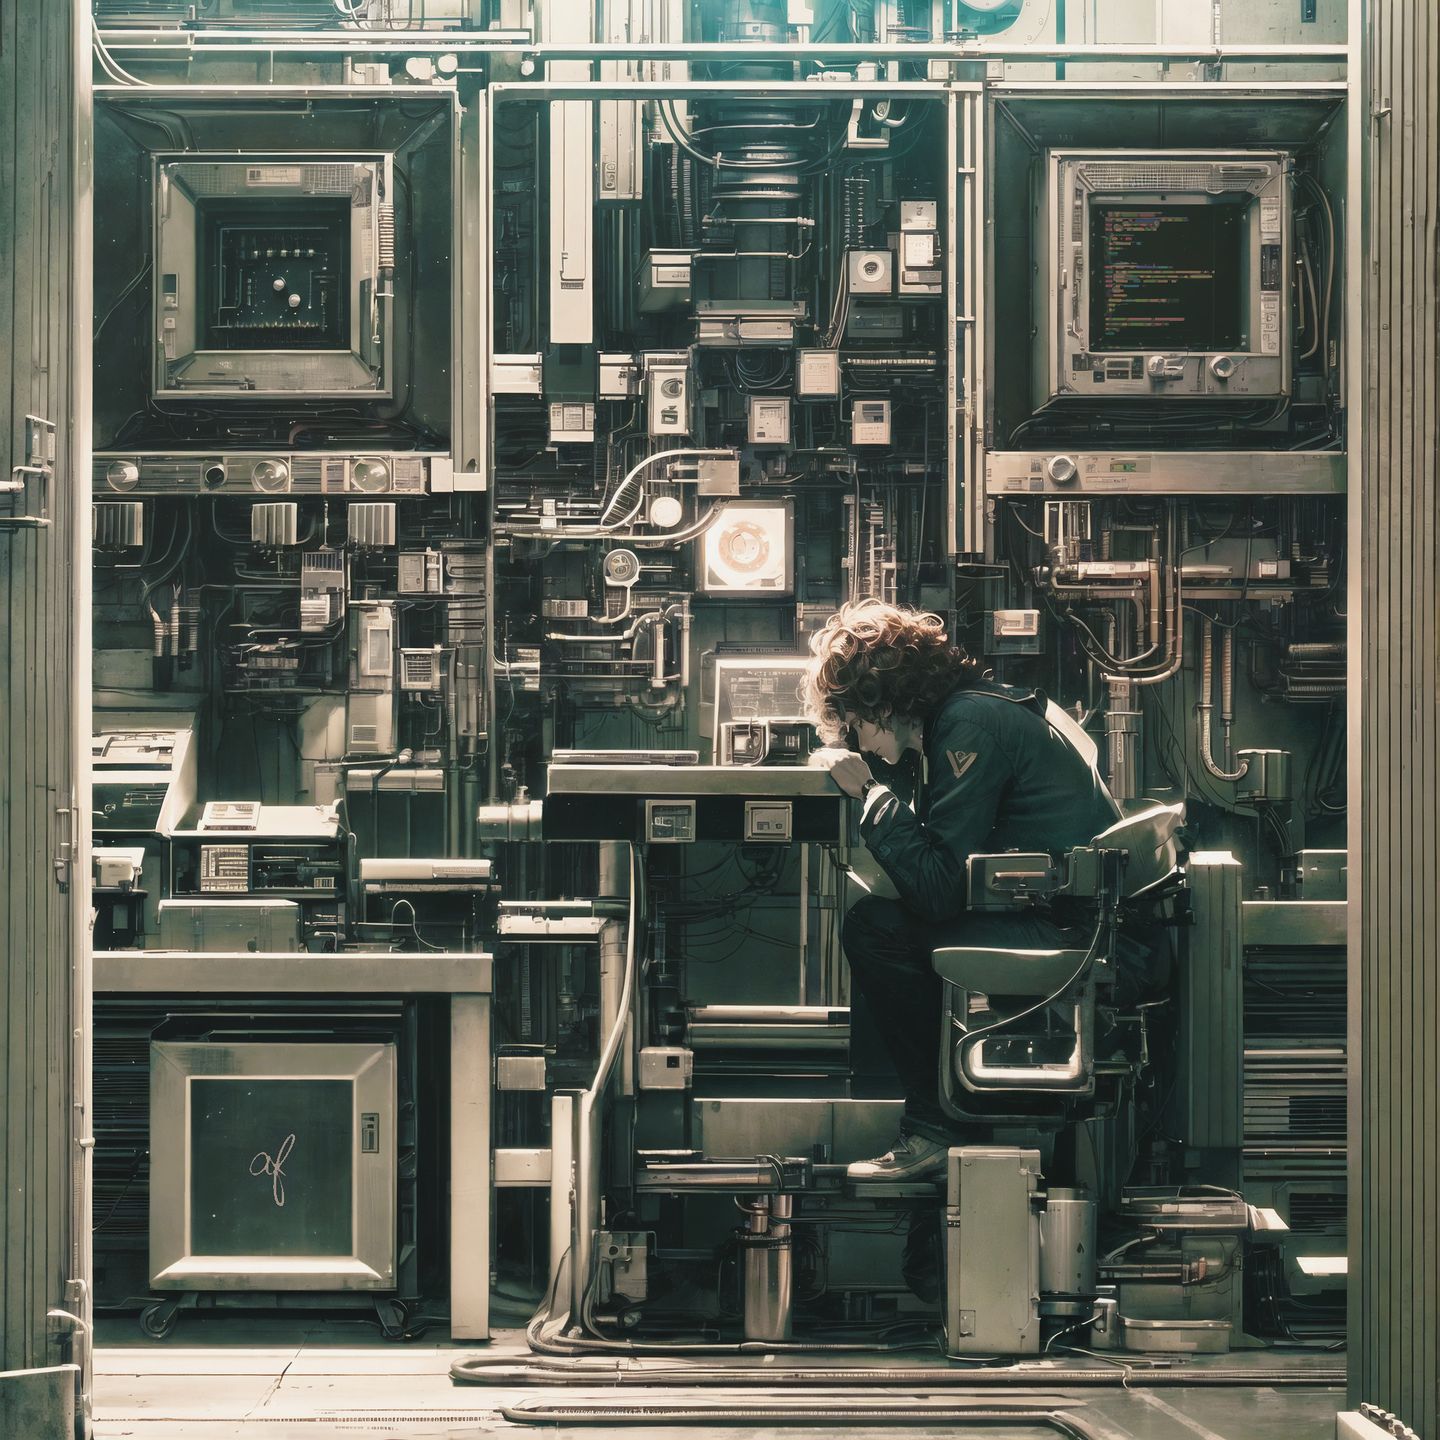
From approximately one hundred variations, I ultimately chose the following image as the starting point:
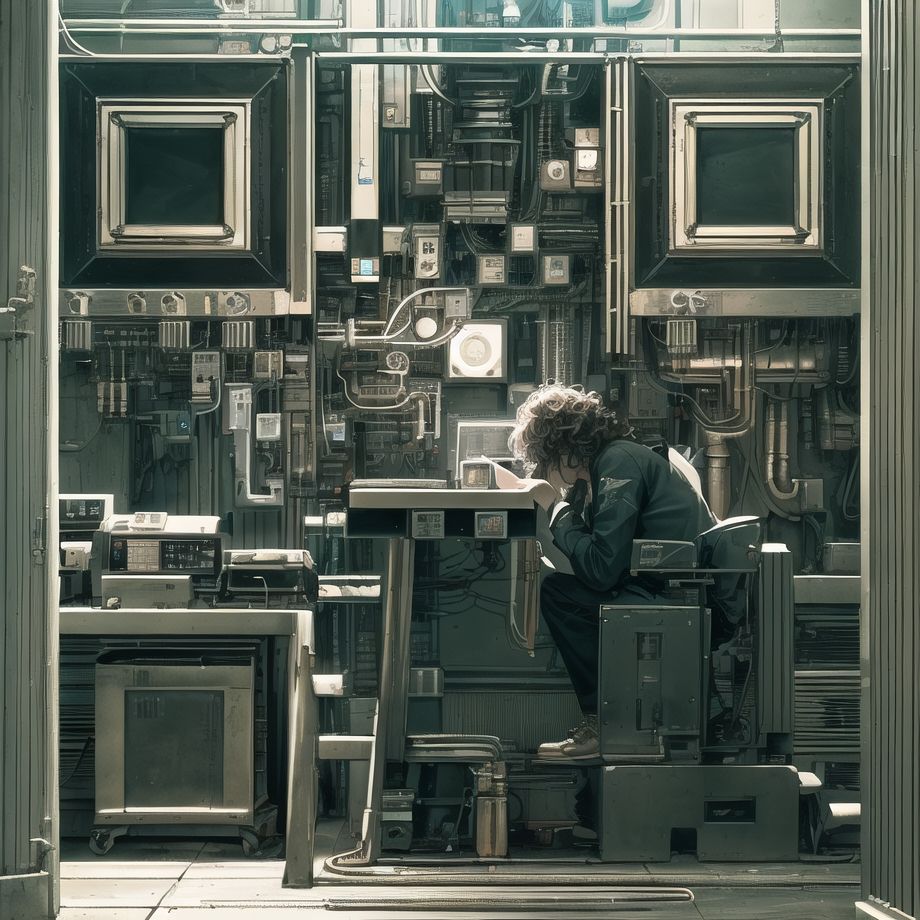
It gets pretty interesting composition, while being less obvious as a QR code. So I decided to proceed with it and add add a bit more details. (You can compare it with the final result to see the changes I made.)
5. Refining Details
Update: I recently built a toolkit to help with this process, check my new blog post 👉 Refine AI Generated QR Code for more details.
The generated images from the model are not perfect in every detail. For instance, you may have noticed that the hand and face appear slightly distorted, and the three anchor boxes in the corner are less visually appealing. We can use the inpaint feature to tell the model to redraw some parts of the image (it would better if you keep the same or similiar prompts as the original generation).
Inpainting typically requires a similar amount of time as generating a text-to-image, and it involves either luck or patience. Often, I utilize Photoshop to "borrow" some parts from previously generated images and utilize the spot healing brush tool to clean up glitches and artifacts. My Photoshop layers would looks like this:
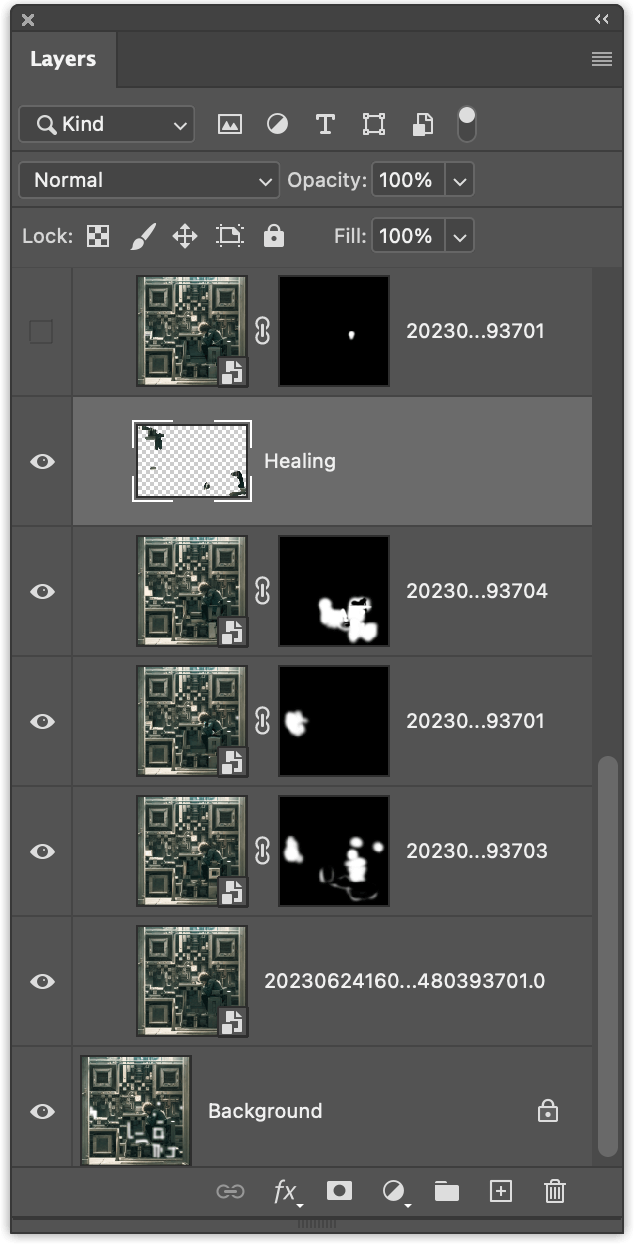
After making these adjustments, I’ll send the combined image back for inpainting again to ensure a more seamless blend. Or to search for some other components that I didn’t found in other images.
Specifically on the QR Code, in some cases ControlNet may not have enough prioritize, causing the prompts to take over and result in certain parts of the QR Code not matching. To address this, I would overlay the original QR Code image onto the generated image (as shown in the left image below), identify any mismatches, and use a brush tool to paint those parts with the correct colors (as shown in the right image below).
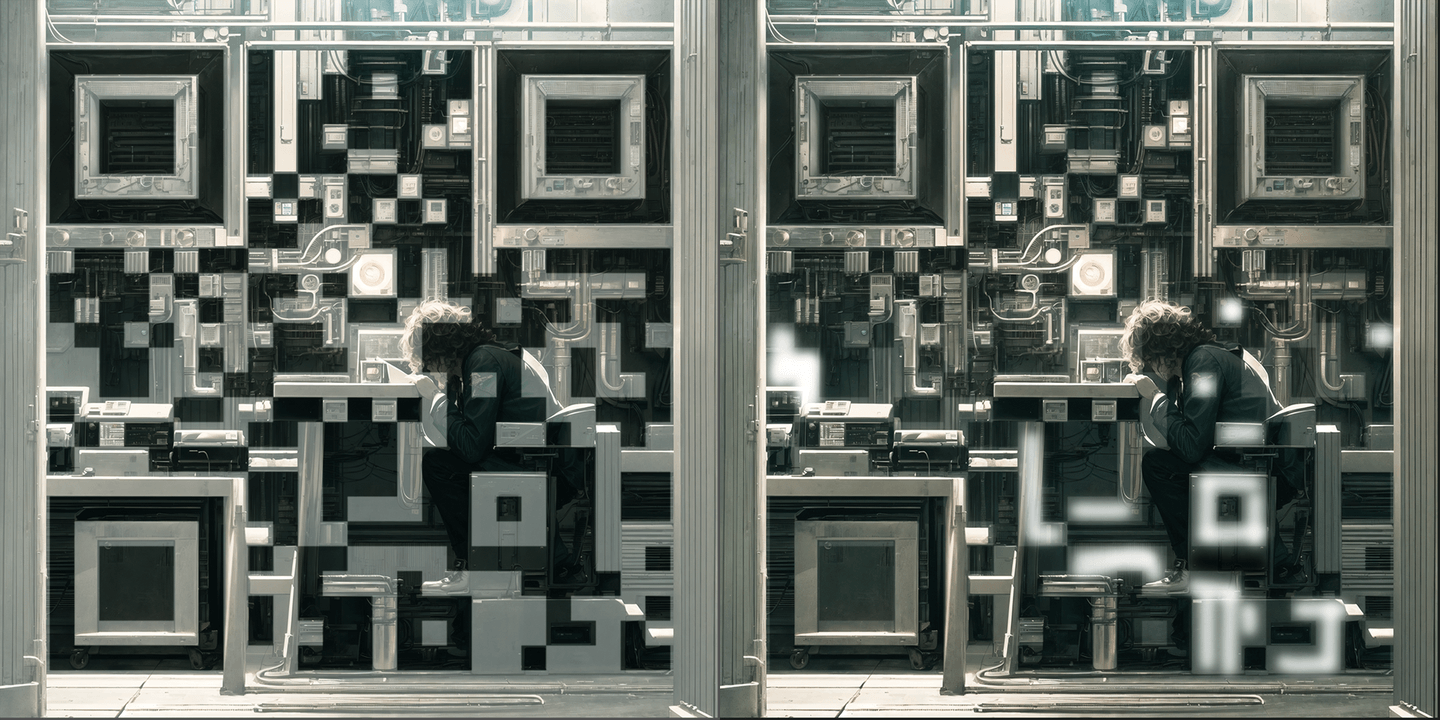
I then export the marked image for inpainting once again, adjusting the Denoising strength to approximately 0.7. This would ensures that the model overrides our marks while still respecting the color to some degree.
Ultimately, I iterate through this process multiple times until I am satisfied with every detail.
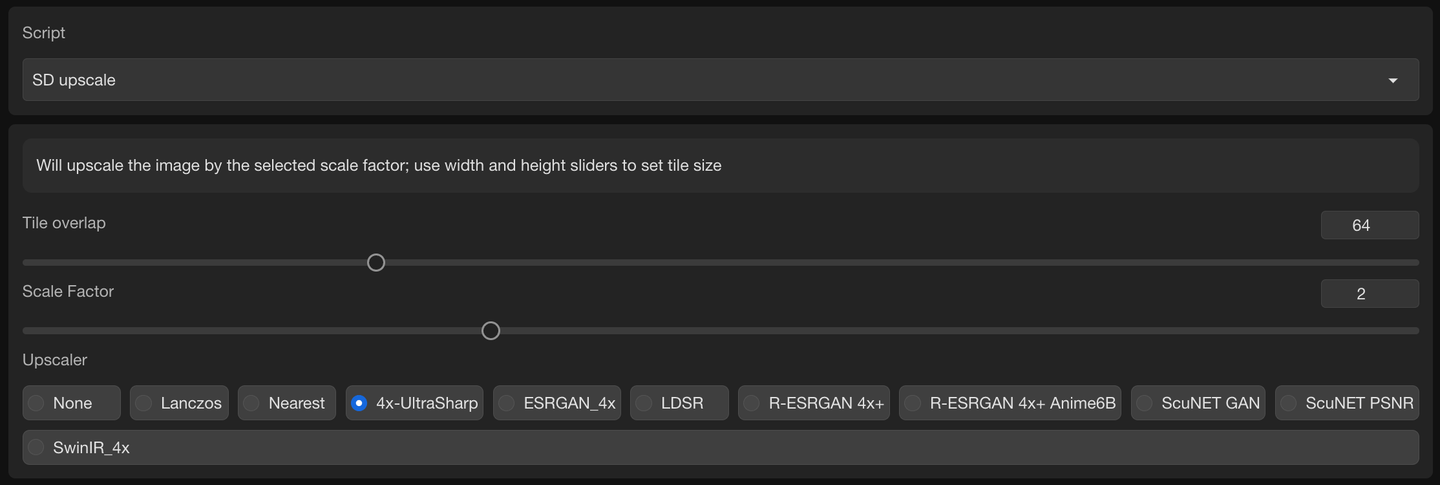
6. Upscaling
The recommended generation size is 920x920 pixels. However, the model does not always generate highly detailed results at the pixel level. As a result, details like the face and hands can appear blurry when they are too small. To overcome this, we can upscale the image, providing the model with more pixels to work with. The SD Upscaler script in the img2img tab is particularly effective for this purpose. You can refer to the guide Upscale Images With Stable Diffusion for more information.
7. Post-processing
Lastly, I use Photship and Lightroom for subtle color grading and post-processing, and we are done!
The one I end up with not very good error tolerance, you might need to try a few times or use a more forgiving scanner to get it scanned :P
Conclusion
Creating this image took me a full day, with a total of 10 hours of learning, generating, and refining. The process was incredibly enjoyable for me, and I am thrilled with the end result! I hope this post can offer you some fundamental concepts or inspire you to embark on your own creative journey. There is undoubtedly much more to explore in this field, and I eager to see what’s coming next!
Join my Discord Server and let’s explore more together!
If you want to learn more about the refining process, go check my new blog post: Refining AI Generated QR Code.
References
Here are the list of resources for easier reference.
Concepts
Tools
- Hardwares & Softwares I am using.
- AUTOMATIC1111/stable-diffusion-webui - Web UI for Stable Diffusion
- canisminor1990/sd-webui-kitchen-theme - Nice UI enhancement
- Mikubill/sd-webui-controlnet - ControlNet extension for the webui
- QR Code Generator Library - QR code generator that is ad-free and customisable
- Adobe Photoshop - The tool I used to blend the QR code and the illustration
Models
- Control Net Models for QR Code (you can pick one of them)
- Checkpoint Model (you can use any checkpoints you like)
- Ghostmix Checkpoint - A very high quality checkpoint I use. You can use any other checkpoints you like
Tutorials
- Stable Diffusion LoRA Models: A Complete Guide - The one I used to get started
- (Chinese) Use AI to genereate scannable images - Unfortunately the article is in Chinese and I didn’t find a English version of it.
- Upscale Images With Stable Diffusion - Enlarge the image while adding more details