This post will be a bit longer than usual. It’s quite a big announcement to me, and there are many things I want to talk about. I’ll be appreciated if you take the time to read through it. The table of contents is hidden on the left if you are on a desktop. Hope you enjoy :)
What is Atomic CSS?
Let’s first give a proper definition to Atomic CSS:
From this article by John Polacek:
Atomic CSS is the approach to CSS architecture that favors small, single-purpose classes with names based on visual function.
Some might also call it Functional CSS, or CSS utilities. Basically, you can say an Atomic CSS framework is a collection of the CSS like these:
.m-0 {
  margin: 0;
}
.text-red {
  color: red;
}
/* ... */
We have quite a few utilities-first CSS framework like Tailwind CSS, Windi CSS and Tachyons, etc. And there are also some UI libraries that come with some CSS utilities as the complement to the framework, for example Bootstrap and Chakra UI.
We are not going to talk about the pros and cons of using atomic CSS here, as you might hear them many times already. Today, we are going to use a framework author’s perspective to see how we make the trade-off building those frameworks you love, their limitations, what we can do better to eventually benefits your daily work.
The Background
Before we start, let’s talk a bit about the background. If you don’t know me, my name is Anthony Fu, and I am a Vite team member and the creator of Vitesse, one of the most popular starter templates for Vite. I enjoy the speedy development experience of atomic CSS (or CSS utilities), so I chose to use Tailwind CSS as the default UI framework for Vitesse. While Vite should be incredibly fast compared to Webpack and others, Tailwind, which generates megabytes of utility CSS, makes the start-up and HMR on Vite slow as the old days. I once thought this was some kind of trade-off for using atomic CSS solutions - until I discovered Windi CSS.
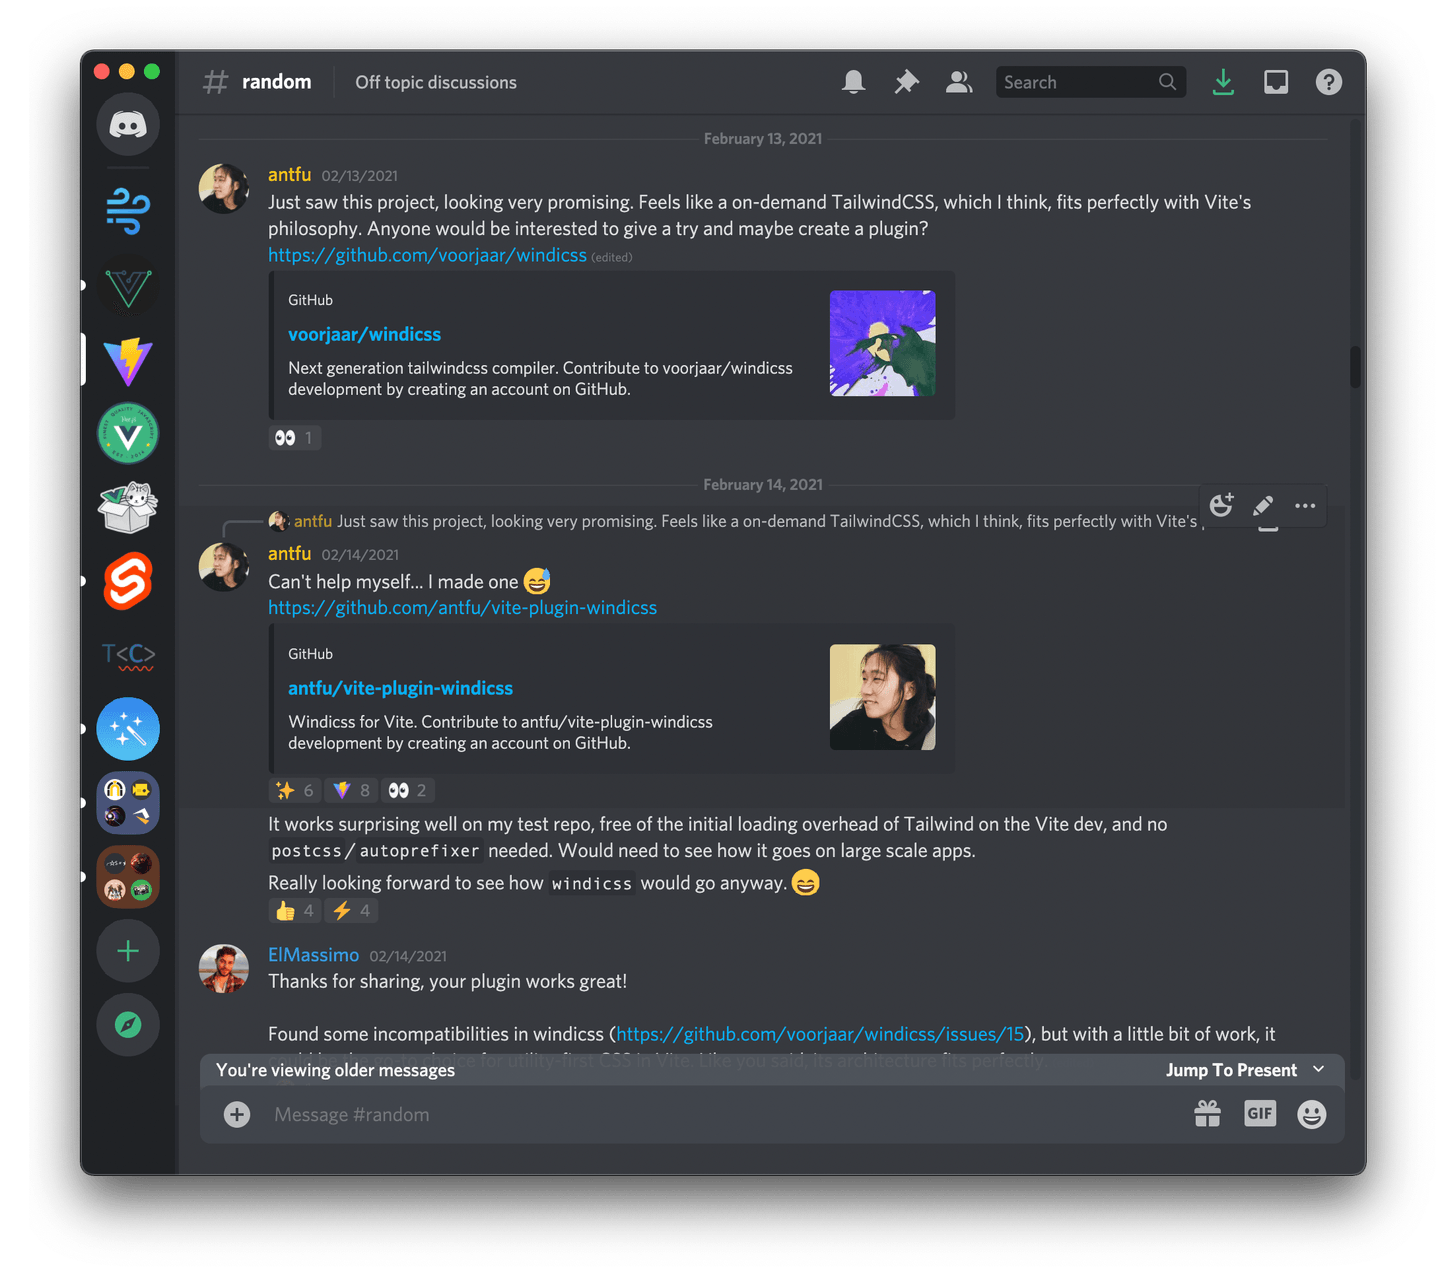
Windi CSS was a Tailwind CSS alternative that was written from scratch. It has zero dependencies and does not rely on PostCSS and Autoprefixer. More importantly, it features on-demanded usage. Instead of generating all the combinations of utilities that you rarely used to purge later, Windi CSS only generates those actually presented in your codebase. This fits perfectly well with Vite’s on-demanded philosophy, and theoretically, it should be way much faster than Tailwind. So I wrote the Vite plugin for it, and it turned out to be 20~100x faster than Tailwind.
It went pretty well, Windi CSS grown into a team, we made many more innovations like Value Infering, Variant Groups, Shortcuts, Design in DevTools, Attributify Mode, etc. As the result, Tailwind was ass kicked to introduce their own on-demand JIT engine.
Breakdown Atomic CSS
Back to the topic, let’s take a look at how atomic CSS works first.
Traditional Way
The traditional way of making Atomic CSS is to provide all the CSS utilities you might possibly want, for example, here is something you could generate your own with a preprocessor (SCSS in this case):
// style.scss

@for $i from 1 through 10 {
  .m-#{$i} {
    margin: $i / 4 rem;
  }
}
It will be compiled to:
.m-1 { margin: 0.25 rem; }
.m-2 { margin: 0.5 rem; }
/* ... */
.m-10 { margin: 2.5 rem; }
Great, now you can use class="m-1" to set the margin. But as you might see, with this approach, you can’t set the margin outside of 1 to 10, and also, you need to pay the cost of shipping 10 CSS rules even if you have only used one. Later if you want to support different margin directions like mt for margin-top, mb for margin-bottom. With those 4 directions, you are multiplying your CSS size by 5. Then when it comes to variants like hover: and focus: - you know the story. At that point, adding one more utility often means you are going to introduce a few extra kilobytes. Thus, this is also why the traditional Tailwind ships megabytes of CSS.
To solve this, Tailwind came up with the solution by using PurgeCSS to scan your dist bundle and remove the rules you don’t need. Now you have only a few KBs of CSS in production. However, note that the purging would only work in the production build, meaning you are still working with the tremendous CSS in development. It wasn’t that prominent in Webpack, but it becomes a pain in Vite, given the rest are now coming blazing fast.
While generating and purging approach have its limitations, could we have a better solution?
On-demand Way
The "on-demand" idea introduces a brand new way of thinking. Let’s make a comparison of the approaches here.
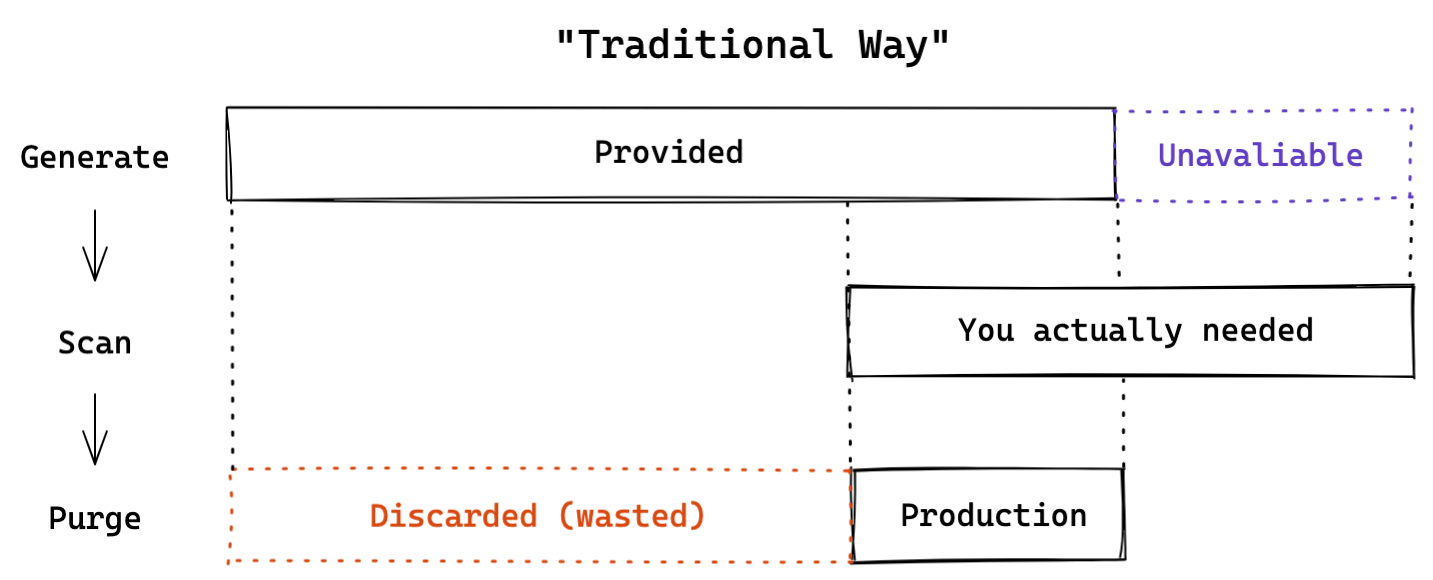
The traditional way not only costs you unnecessary computation (generated but not in use) but is also unable to satisfy your needs that are not included in the first place.
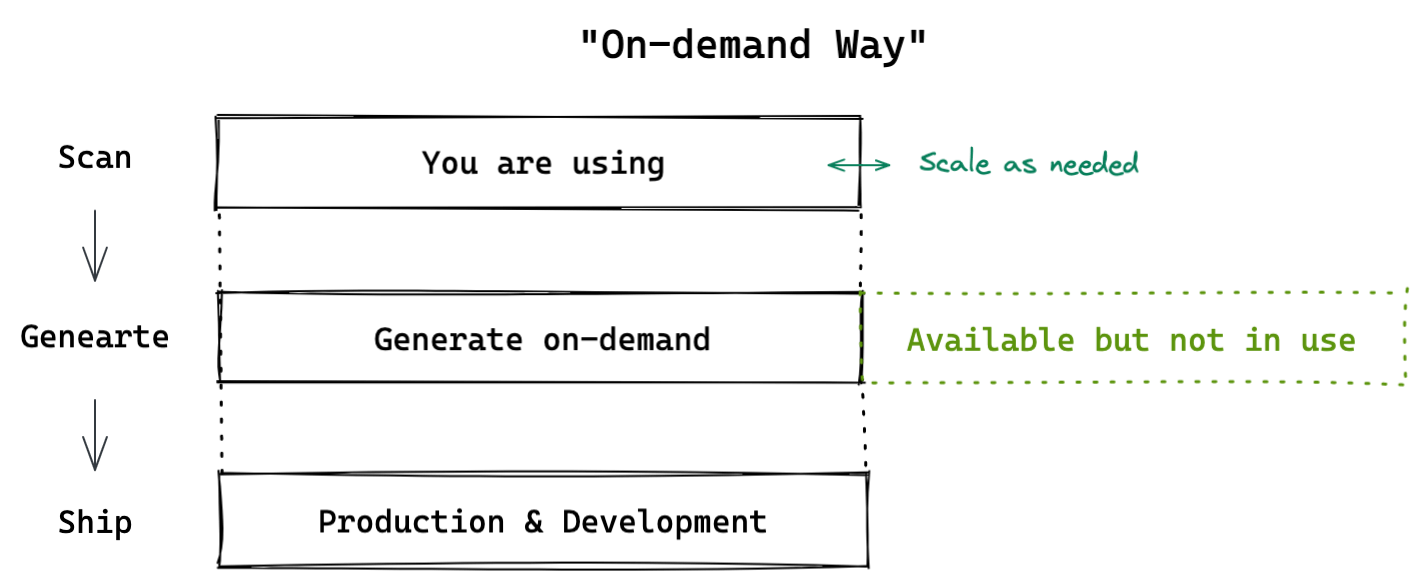
By flipping the order of "generating" and "usage scanning", the "on-demand" approach saves you the wasted computational and transferring cost, while being flexible to provide the dynamic needs that pre-generating can’t possibly be covered. Meanwhile, this approach could be used in both development and production, provide more confidence about the consistency and make HMR more efficient.
To achieve this, both Windi CSS and Tailwind JIT take the approach of pre-scanning your source code. Here is a simple example of that:
import { promises as fs } from 'node:fs'
import glob from 'fast-glob'

// this usually comes from user config
const include = ['src/**/*.{jsx,tsx,vue,html}']

async function scan() {
  const files = await glob(include)

  for (const file of files) {
    const content = await fs.readFile(file, 'utf8')
    // pass the content to the generator and match for class usages
  }
}

await scan()
// scanning is done before the build / dev process
await buildOrStartDevServer()
To provide HMR during development, a file watcher is usually needed:
import chokidar from 'chokidar'

chokidar.watch(include).on('change', (event, path) => {
  // read the file again
  const content = await fs.readFile(file, 'utf8')
  // pass the content to the generator again
  // invalidate the css module and send HMR event
})
As a result, with the on-demand approach, Windi CSS is able to provide about 100x faster performance than the traditional Tailwind CSS.
The Itches
I am now using Windi CSS on almost all my apps, and it works pretty well. The performance is sweet, and the HMR is unnoticeable. Value Auto Infering and Attributify Mode makes my development even faster. I could really take a good sleep and dream about other things then. However, it sometimes itches me from my sweet dream.
The one I found annoying is the unclearness of what I am getting and what to do to make it work. To me, the best ideally atomic CSS should be invisible. Once learned, it should be intuitive and analogous to know the others. It’s invisible when it works as you expect and could become frustrating when it doesn’t.
For example, you know that in Tailwind’s border-2 means 2px of border width, 4 for 4px, 6 for 6px, 8 for 8px, but guess what, border-10 does NOT work (it could also take your time to figure it out!). You might say this is designed on purpose by Tailwind to make the design system consistent and limited. Ok fine, but here is a quick quiz, let’s say if you want border-10 to work, how would you do that?
Write your own utility somewhere in your global styles?
.border-10 {
  border-width: 10px;
}
That’s pretty fast and straightforward. And importantly, it works. But honestly, if I need to do this manually myself, why would I need Tailwind in the first place?
If you know Tailwind a bit more, you might know it can be configured. So you spend 5 minutes searching for their docs, here is what you end up with:
// tailwind.config.js
module.exports = {
  theme: {
    borderWidth: {
      DEFAULT: '1px',
      0: '0',
      2: '2px',
      3: '3px',
      4: '4px',
      6: '6px',
      8: '8px',
      10: '10px' // <-- here
    }
  }
}
Ah, fair enough, now we could list them all and get back to work… wait, where was I? The original task you are working on gets lost, and it takes time to get back to the context again. Later on, if we want to set border colors, we’d need to look up the docs again to see how it could be configured and so on. Maybe someone would enjoy this workflow, but it’s not for me. I don’t enjoy being interrupted by something that should intuitively work.
Windi CSS is more relaxed to the rules and will try to provide the corresponding utilities whenever possible. In the previous case, border-10 will work out-of-box on Windi (thank you!). But due to the fact that Windi is compatible with Tailwind, it also has to use the exact same configuration interface as Tailwind. While the number inferring works in Windi, it would still be a nightmare if you want to add custom utilities. Here is an example from Tailwind’s docs:
// tailwind.config.js
const _ = require('lodash')
const plugin = require('tailwindcss/plugin')

module.exports = {
  theme: {
    rotate: {
      '1/4': '90deg',
      '1/2': '180deg',
      '3/4': '270deg',
    }
  },
  plugins: [
    plugin(({ addUtilities, theme, e }) => {
      const rotateUtilities = _.map(theme('rotate'), (value, key) => {
        return {
          [`.${e(`rotate-${key}`)}`]: {
            transform: `rotate(${value})`
          }
        }
      })

      addUtilities(rotateUtilities)
    })
  ]
}
That alone is to generate these:
.rotate-1\/4 {
  transform: rotate(90deg);
}
.rotate-1\/2 {
  transform: rotate(180deg);
}
.rotate-3\/4 {
  transform: rotate(270deg);
}
The code to generate the CSS is even longer than the outcome. It could be hard to read and maintain, and meanwhile, it breaks the on-demand ability.
Tailwind’s API and plugin system is designed with the traditional mindset and does not really match the new on-demand approach. Core utilities are baked in the generator, and the customization is quite limited. So, I started wondering if we could abandon those debts and redesign it ground-up with the on-demand approach in mind, what would we get?
Introducing UnoCSS
UnoCSS - the instant atomic CSS engine with maximum performance and flexibility.
It started with some random experiments during my national holiday. With the mind of on-demand and the flexibility that I would expect as a user, the experiments turned out to be very good to me in many ways.
The Engine
UnoCSS is an engine instead of a framework because there are no core utilities - all the functionalities are provided via presets or inline configurations.
We are imagining UnoCSS being able to simulate the functionalities of most of the existing atomic CSS frameworks. And possibly have been used as the engine to create some new atomic CSS frameworks! For example:
import PresetAntfu from '@antfu/oh-my-cool-unocss-preset'

import PresetBootstrap from '@unocss/preset-bootstrap'
// the following presets do not exist at this moment,
// contribution welcome!
import PresetTachyons from '@unocss/preset-tachyons'
import PresetTailwind from '@unocss/preset-tailwind'
import PresetWindi from '@unocss/preset-windi'
import UnocssPlugin from '@unocss/vite'

export default {
  plugins: [
    UnocssPlugin({
      presets: [
        // PresetTachyons,
        PresetBootstrap,
        // PresetTailwind,
        // PresetWindi,
        // PresetAntfu

        // pick one... or multiple!
      ]
    })
  ]
}
Let’s take a look at how it made them possible:
Intuitive & Fully Customizable
The main goals of UnoCSS are intuitiveness and customization. It allows you to define your own utilities literally in seconds.
Here is a quick guide through:
Static Rules
Atomic CSS might come huge in terms of the amount. It’s important to have the rules definition straightforward and easy to read. To create a custom rule for UnoCSS, you can write it as follows:
rules: [
  ['m-1', { margin: '0.25rem' }]
]
Whenever m-1 is detected in users’ codebase, the following CSS will be generated:
.m-1 { margin: 0.25rem; }Dynamic Rules
To make it dynamic, change the matcher to a RegExp and the body to a function:
rules: [
  [/^m-(\d+)$/, ([, d]) => ({ margin: `${d / 4}rem` })],
  [/^p-(\d+)$/, match => ({ padding: `${match[1] / 4}rem` })],
]
The first argument of the body function is the match result, so you can destructure it to get the RegExp matched groups.
For example, with the usage:
<div class="m-100">
  <button class="m-3">
    <icon class="p-5" />
    My Button
  </button>
</div>
the corresponding CSS will be generated:
.m-100 { margin: 25rem; }
.m-3 { margin: 0.75rem; }
.p-5 { padding: 1.25rem; }
That’s it. You only need to add more utilities using the same pattern, and now you got your own atomic CSS running!
Variants
Variants in UnoCSS are also simple yet powerful. Here are a few examples:
variants: [
  // support `hover:` for all rules
  {
    match: s => s.startsWith('hover:') ? s.slice(6) : null,
    selector: s => `${s}:hover`,
  },
  // support `!` prefix to make the rule important
  {
    match: s => s.startsWith('!') ? s.slice(1) : null,
    rewrite: (entries) => {
      // append ` !important` to all css values
      entries.forEach(e => e[1] += ' !important')
      return entries
    },
  }
]
The configurations of variants could be a bit advanced. Due to the length of the post, I will skip the detailed explanation here, you can refer to the docs for more details.
Presets
Now you can pack your custom rules and variants into presets and share them with others - or create even your own atomic CSS framework on top of UnoCSS!
Meanwhile, we ship with a few presets for you to get your hands on quickly.
One thing worth mentioning is the default @unocss/preset-uno preset (still experimental) is a common superset of the popular utilities-first framework, including Tailwind CSS, Windi CSS, Bootstrap, Tachyons, etc.
For example, both ml-3 (Tailwind), ms-2 (Bootstrap), ma4 (Tachyons), mt-10px (Windi CSS) are valid.
.ma4 { margin: 1rem; }
.ml-3 { margin-left: 0.75rem; }
.ms-2 { margin-inline-start: 0.5rem; }
.mt-10px { margin-top: 10px; }
Learn more about the default preset.
Flexibility
Till now, we are all showcasing how you can use UnoCSS to mimic the behavior of Tailwind - while we made it really easy to mimic Tailwind by your own, that alone probably won’t make much difference on the user side.
Let’s unleash the true power of UnoCSS:
Attributify Mode
The Attributify Mode is one of the beloved features of Windi CSS. It helps you better organize and group your utilities by using attributes.
It turns your Tailwind code from this:
<button class="bg-blue-400 hover:bg-blue-500 text-sm text-white font-mono font-light py-2 px-4 rounded border-2 border-blue-200 dark:bg-blue-500 dark:hover:bg-blue-600">
  Button
</button>
to:
<button
  bg="blue-400 hover:blue-500 dark:blue-500 dark:hover:blue-600"
  text="sm white"
  font="mono light"
  p="y-2 x-4"
  border="2 rounded blue-200"
>
  Button
</button>
Not only this provide better organization by the categories, but also saves you the repetitive typing of the same prefixes.
In UnoCSS, we implemented the Attributify Mode by using only one variant and one extractor with less than 100 lines of code in total! More importantly, it directly works for any custom rules you have defined!
In addition Windi’s Attributify Mode, we also support valueless attributes with a few lines of changes:
<div class="m-2 rounded text-teal-400" />now can be
<div m-2 rounded text-teal-400 />Attributify Mode is provided via preset @unocss/preset-attributify, refer to its docs for detailed usages.
Pure CSS Icons
If you’ve ever read my previous post Journey with Icons Continues you must know that I am very enthusiastic about icons and actively researching for icons solutions. This time with UnoCSS’s flexibility, we could even have pure CSS icons! Yes, you read me, it’s purely in CSS and zero JavaScript! Let’s just see how it looks like:
<!-- A basic anchor icon from Phosphor icons -->
<div class="i-ph-anchor-simple-thin" />
<!-- An orange alarm from Material Design Icons -->
<div class="i-mdi-alarm text-orange-400 hover:text-teal-400" />
<!-- A large Vue logo -->
<div class="i-logos-vue text-3xl" />
<!-- Sun in light mode, Moon in dark mode, from Carbon -->
<button class="i-carbon-sun dark:i-carbon-moon" />
<!-- Twemoji of laugh, turns to tear on hovering -->
<div class="i-twemoji-grinning-face-with-smiling-eyes hover:i-twemoji-face-with-tears-of-joy" />Combining with variants, you can even switch icons based on hovering state or even color schema. Play with the demo above and see. Thanks to the awesome Iconify project, you have access to over 10,000 icons from over 100 popular icon sets on-demand.
Once again, this feature is written with less than 100 lines of code. Check out the preset’s implementation @unocss/preset-icons to learn the magic!
Update: Read my new post Icons in Pure CSS to learn more about it!
I hope these presets can give you a general idea of how flexible UnoCSS is. Given it’s still in a very early stage, there are many possibilities for us to explore.
Scoping
One other problem that I have faced when using Tailwind/Windi is the preflight. Preflight resets the native elements and provide some fallback for CSS variables, it’s great when developing a new app that uses Tailwind/Windi solely, but when you want to have them work with other UI frameworks, or share some components using Tailwind utilities, the preflight often introduce many conflicts that break your existing UI.
So UnoCSS took another aggressive step by not supporting preflights. Instead, it left the control of CSS resetting fully to users (or frameworks on top of UnoCSS) to use the one that fits their needs (Normalize.css, Reset.css, or UI frameworks’ resetting, etc.)
This also allows UnoCSS to have more possibilities on CSS Scoping. For example, we have an experimental scoped-vue mode on the Vite plugin to generate scoped styles for each component so you can safely ship them as a component library using atomic CSS without worry about conflicting with users’ CSS. For example:
<template>
  <div class="m-2 rounded">
    <slot />
  </div>
</template>

<!-- the following will be inject in the bundler -->
<style scoped>
.m-2 {
  margin: 0.5rem;
}
.rounded {
  border-radius: 0.25rem;
}
</style>
We are also experimenting with more possibilities like Web Components support, CSS code-splitting for MPA, module-level CSS scoping, etc.
Performance
Given all the flexibility and imagination UnoCSS brings, I would frankly think performance can be a less important thing to care about. Just out of curiosity, I wrote a simple benchmark to compare the performances. And surprisingly, here is the result:
10/21/2021, 2:17:45 PM
1656 utilities | x50 runs

none                            8.75 ms /    0.00 ms
unocss       v0.0.0            13.72 ms /    4.97 ms (x1.00)
windicss     v3.1.9           980.41 ms /  971.66 ms (x195.36)
tailwindcss  v3.0.0-alpha.1  1258.54 ms / 1249.79 ms (x251.28)
It turns out, UnoCSS could be 200x faster than Tailwind’s JIT and Windi CSS. To be honest, with the on-demand approach, both Windi and Tailwind JIT are already super-fast, the performance gain in UnoCSS might not be very perceivable. However, the nearly zero overhead means you can integrate UnoCSS into your existing project to work with other frameworks as an incremental solution without worrying about the performance loss.
Deep down, UnoCSS did many performance optimizations. In case you wonder, here is a few of them to take away:
No Parsing, No AST
Internally, Tailwind relied on modifying PostCSS’s AST, while Windi wrote a custom parser and AST. Given the fact that changes in utilities are not commonly expected during the development, UnoCSS generates the utilities by the very cheap string concatenation instead of introducing a whole parser and generating process. Meanwhile, UnoCSS aggressively caches to the class names with their generated CSS string, allowing it to bypass the entire matching and generating process when seeing the same utilities again.
Single Pass
As mentioned in the previous section, both Windi CSS and Tailwind JIT rely on the pre-scanning for the file system and use fs watcher for HMR. File IO inevitably introduces some overhead, while your build tools are actually needed to load them once again. So why don’t we leverage the content that has already been read by the dev tools directly?
Other than the independent generator core, UnoCSS intentionally only provides Vite plugin which allows it to focus on the best possible integration with Vite.
Updates: Now it also provides a Webpack plugin and a CSS-in-JS runtime
In Vite, the transform hook will be iterated over with all the files with their content. So we can write a plugin to collect them like:
export default {
  plugins: [
    {
      name: 'unocss',
      transform(code, id) {
        // filter out the files you don't want to scan
        if (!filter(id))
          return

        // scan the code (also handles invalidate on dev)
        scan(code, id)

        // we just want the content, so we don't transform the code
        return null
      },
      resolveId(id) {
        return id === VIRTUAL_CSS_ID ? id : null
      },
      async load(id) {
        // generated css is provide as a virtual module
        if (id === VIRTUAL_CSS_ID)
          return { code: await generate() }
      }
    }
  ]
}
Given Vite also handles the HMR and will involve the transform hook again of upon file changes, this allows UnoCSS to finish everything in a single pass with no duplication of file IO and fs watcher. In addition to that, with this approach, the scanning relies on the module graph instead of file globing. Meaning that only the modules that been bundled into your app will affect the generated CSS instead of any files under your folders.
There are a few more tricks we have done to squeeze out even more performance. I might do another post about them later, but before that, you can read the code to figure out :)
Can I Use it Now?
For the short answer: Yes, but with cautions.
UnoCSS is still in experiments. But given its simplicity, the generation result is already quite reliable. One thing you need to care about is the APIs are not finalized yet. We will indeed follow semver on releasing, but please expect changes.
It’s not designed to be a replacement of Windi CSS or Tailwind (consider waiting for Windi CSS v4). We don’t recommend migrating existing projects to UnoCSS completely. You can try it on new projects or use it as a complement along with your existing CSS framework (for example, disable default preset and use the icon preset solely for pure CSS icons, or make your custom rules).
Oh btw, the site you are reading is now solely on UnoCSS, for you to reference :P.
Meanwhile, please feel free to share the presets you are making or help contribute to our default presets. We can’t wait to see what you can come up with!
Thanks
Appreciate the early review and feedback provided by (A-Z):
Wrapping Up
Thanks a lot for reading through! If it ever got you interested, do remember to check out the repo unocss/unocss for more details and play with it on the Online Playground.
Please feel free to comment or retweet this tweet letting me know what you think! 🙌